How To Start a Wordpress Blog on Bluehost
 Can you imagine being a serious blogger, and having a domain name like makingmoney.wordpress.com? It doesn’t look very professional does it? Compare that to MakingMoney.com and you’ll look and feel a lot more credible on the Internet.
Let’s see how we can get you owning part of the Internet for yourself. Yes, for as little as the cost of a large coffee per month, you could own part of the Internet. Wow!
Yes, it’s accessible to EVERYONE, and all you need to get started is to find a trustworthy company to host your blog, so you don’t need to deal with all that technical stuff.
Think it through fully, and if you are answering Yes, Yes, Yes, then allow me to show How to Start a Blog. I use and recommend Bluehost because I’ve used them for over 10 years and trust them 100% with my web hosting. If you want to install WordPress, Bluehost will be your best no fuss solution.
But why do I recommend Bluehost for serious bloggers?
- 24/7 Support and YES they speak your language and not technical jargon
- 99.9% uptime means you’ll always be available to your readers
- Low-Cost Hosting because you share the server expenses with other people like you
- You get a FREE Domain Name which makes set-up even easier
- Bluehost’s money-back guarantee doesn’t lock you in
- Self-Hosted blogging means you are free to earn money from your blog
- As your blog grows, Bluehost seamlessly grows with you
- Pay only for what you need, upgrading is a just a phone call away
Still not convinced?
Then don’t panic, I’ll hold you by the hand through the whole process, so you won’t get lost in all the Internet Jargon.
Sounds great, right?
Well let’s get started shall we. First let’s bring up the Bluehost screen so you can follow along.
I’ll use Bluehost for this demonstration

NB: Bluehost is one of my trusted affiliates and I get a small commission if you decide to use them for hosting. This money allows me to invest the time into great content for my readers. I just wanted to be upfront with you and won’t feel bad if you just search for them yourself. Regardless, I’d still recommend Bluehost as I find their services and 24/7 support to be better than the other low-cost blog hosting companies.
How to Start a WordPress Blog on Bluehost Video Guide **updated**
I have created a quick video tutorial for those that prefer to learn by watching others, otherwise there is more detail in the step-by-step instructions below.
Setting up your BlueHost Account for WordPress
1. Get Started
On the Bluehost, setup page click the green the ‘Get Started Now’ Button

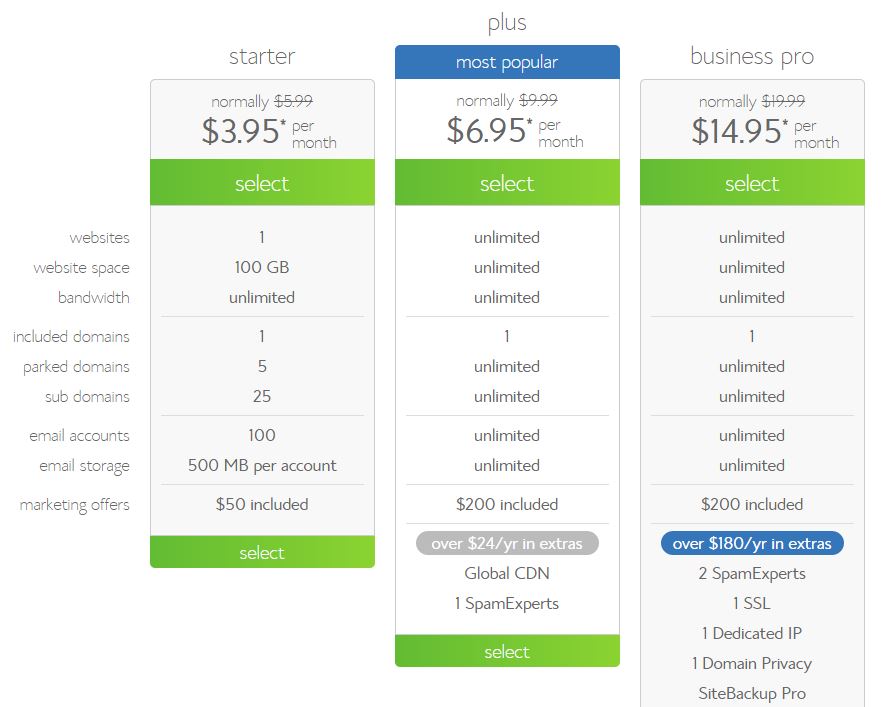
2. Select your Plan
Next you’ll need to decide if you are going to setup just one blog, or are already thinking about an empire of blogging possibilities. Knowing what you are planning will help you to decide which plan is best for you. Here let me explain…
Starter Plan – Offers basic single domain hosting. It’s great if you are just getting started and is a lowest cost alternative.
Plus Plan – This is similar to the Starter Plan, but gives you the ability to host unlimited domains. This plan is ideal if you are planning of that blogging empire I spoke of earlier. This plan is popular because once you get the blogging bug you’ll know doubt have other ideas and want to experiment with other blogs. Perhaps you even want to build them up to sell them.
Business Pro – When you find yourself, becoming a successful blogger, you’ll soon learn that speed is important to your readers and choosing or upgrading to the Business Pro plan would be a better option. Personally, I just start on this plan because I have a positive mindset and know I’m going to need the speed before too long.
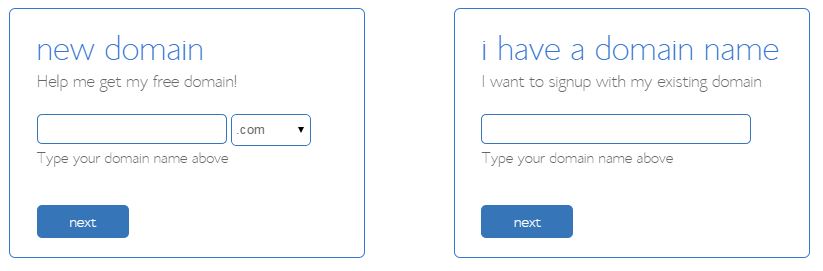
3. Choosing you Domain Name
Now you need to choose a domain name for your blog. Hopefully, by this stage you already have a great name in mind for your blog. Go ahead and enter the domain name into the ‘New Domain’ dialog box, and then press next.
With some luck, your domain name will still be available and we can proceed. If it’s not available then keep trying until you find something that is a close fit. If you need help with that, then check out this blog post on blog name generators, as it might help you to find that perfect name.
NB: Bluehost currently gives a free domain registration with every account so you might as well use it.
However, if you have already registered a domain, then you’ll type that in the ‘I have a domain name’ dialog box. Then you’ll point your domain to the Bluehost name servers; NS1.BLUEHOST.COM and NS2.BLUEHOST.COM
It’s easy isn’t it, so let’s proceed.
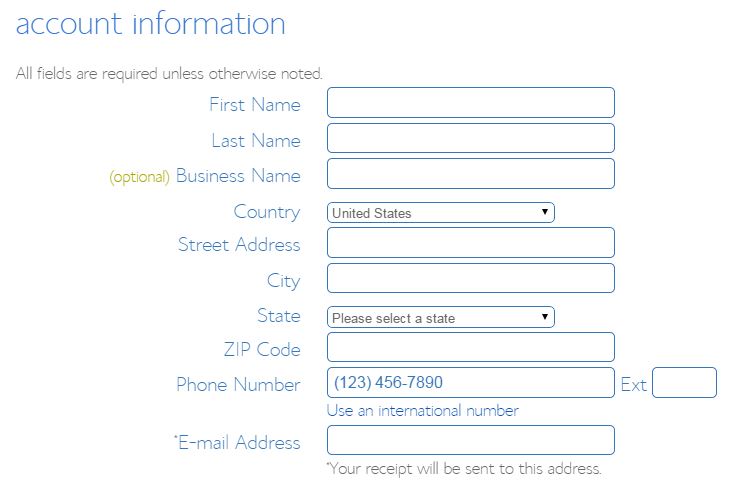
Step 4. – Account Information Setup
Now you just need to tell Bluehost a little about yourself, so they can make sure you’re a real person and know who the domain is registered to. Just populate your details in the form.
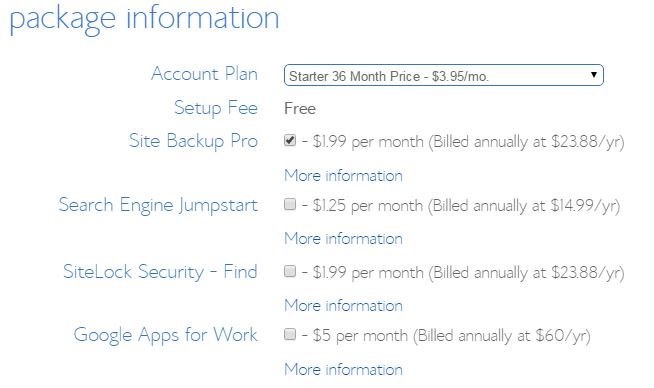
Step 5. – Package Information
Ok, there is a little upsell here, and you can choose the features you need, but first you’ll need to select the duration of your Domain Hosting Plan. The longer you choose the cheaper it’ll be.
Psst, go for the cheapest plan because if you change your mind, Bluehost will give you your money back. Yep, Bluehost has an ‘Anytime’ money back guarantee that they don’t often promote.
What does this really mean? Well any remaining time you have on your plan is refunded after you cancel it. So if you have 9 months remaining on your plan, Bluehost’s ‘Anytime Guarantee’ will refund 9 months worth of charges. Neat isn’t it. I have used this guarantee before and it really works.
Oh, I also recommend including the Site Backup Pro, as this will allow you to keep better control of your data and allow you to perform restores quickly if you ever have a problem. For instance, I’m no novice and I’ve had to request a restore several times to get me back up to speed quickly.
If you don’t choose the backup option, there are specific plugins you can install for WordPress but we aren’t going to cover that here.
The other options are as they say ‘Optional’, and I never select them.
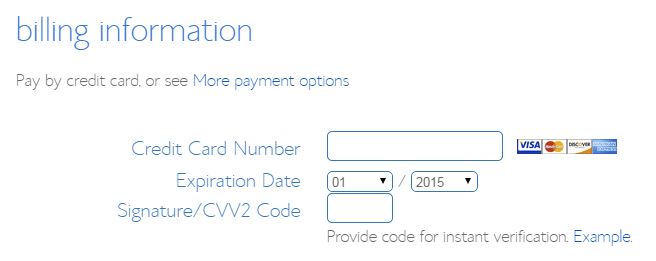
Step 6 – Billing Information
![]() This is fairly straight forward, but make sure you have the little green lock appearing next to the bluehost web address to ensure your details are safe for the Internet.
This is fairly straight forward, but make sure you have the little green lock appearing next to the bluehost web address to ensure your details are safe for the Internet.
Step 7 – Terms of Service
When you have finished reading the Terms of Service and relevant policies check the box and click ‘next’

Step 8 – Setting up a Password
If your registration details are in order then you should be taken to a Password setup screen, where you can choose the password you’ll use to access your Bluehost Control Panel. Always use a complex password with letters, numbers and symbols to ensure your password is safe.
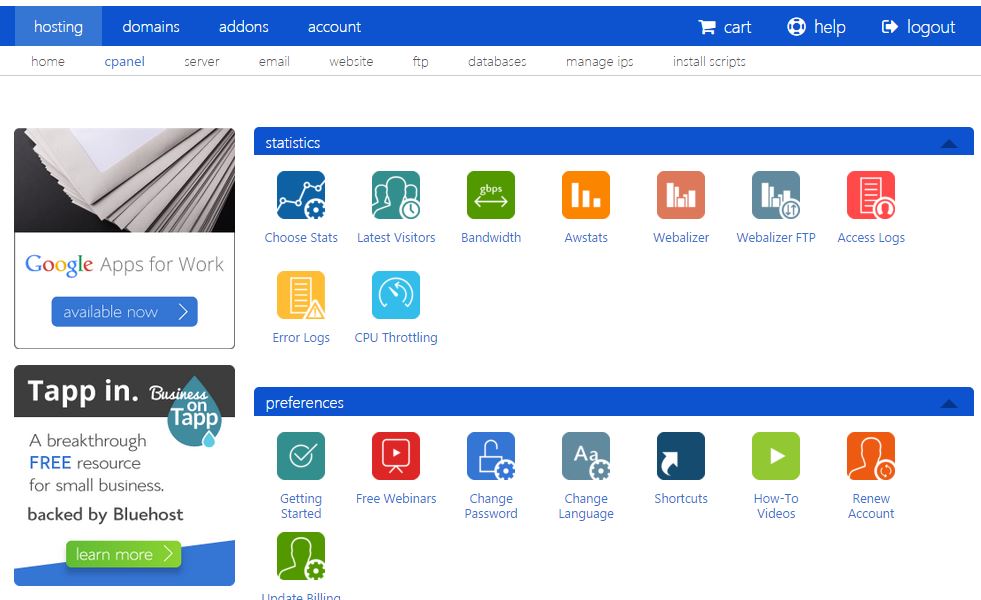
Congratulations! You should now be taken to your Bluehost Control Panel and you have finished the first part. Continue reading for step-by-step instructions on how to easily setup your WordPress software.
What is a Control Panel? There I go using industry terms and haven’t explained what this is, have I? When you host your own blog you have a place where you can configure everything in your Bluehost hosting account, we call this a Control Panel. However, you won’t really need to learn about this until you are getting more confident with your blogging and want to learn about how much traffic your site is getting, doing backups and maybe even configuring your own unique mail account. Bluehost should have sent you an email with your Control Panel access details including your password and login name. If it’s not in your inbox then, take a peep in your junk mail folder. For now we’ll just use the Control Panel to install your WordPress Blog, so let’s continue, shall we…
NB: If you have already registered a domain name and set the account up with that domain, then you’ll need to log into to domain registrar and redirect the domain to the Bluehost name servers NS1.Bluehost.com and NS2.Bluehost.com.
Installing WordPress on Bluehost
Once you have the basic Bluehost set-up completed you’re ready to setup your WordPress Blog. Bluehost makes it really easy to get started using their One-Click WordPress set-up tool.
Installing Blogging software is usually more difficult when you install it yourself and although I promised you the one-click solution, my better judgement suggests you’ll have less problems if we do a few of the account setup steps manually.
But hey, ignore my suggestions if you are in a hurry and just want the One-Click Solution anyway, either way you’ll get to the finish line fast.
NB: Before proceeding with the WordPress installation make sure you are still logged into your Bluehost Control Panel.
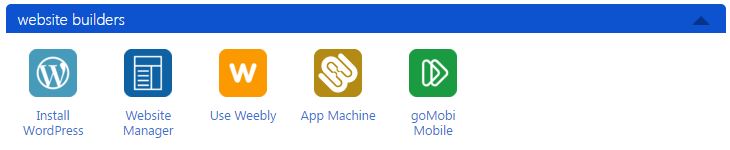
Step 1 – Installing New Packages
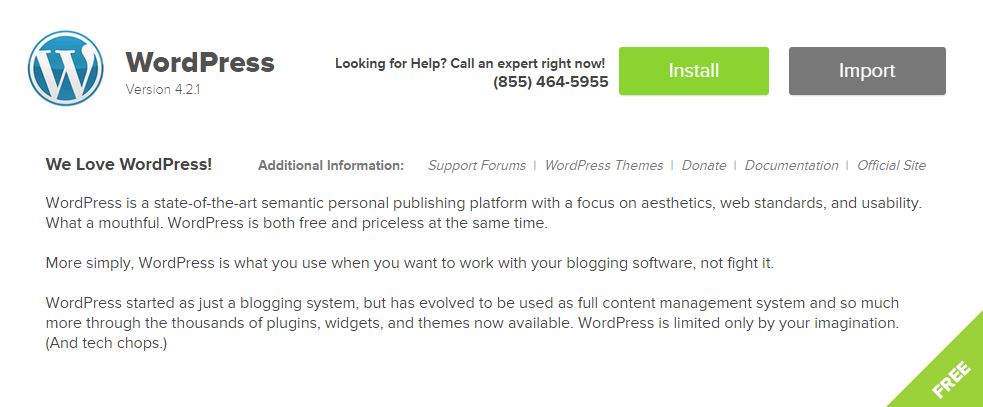
In the Bluehost Control Panel scroll down to the section titled ‘Website Builders’. Now click on the ‘Install WordPress’ button.
Step 2 – Installing WordPress
Congratulations, getting past that last step was as hard as this gets. It’s all down hill from here.
Click on the ‘WordPress Install’ button
Step 3 – Select the Domain for the Installation
I’ll assume you only have one domain name attached to this account so please go ahead and select the default directory.
Now click ‘Check Domain’

This step just makes sure Bluehost knows you own that domain.
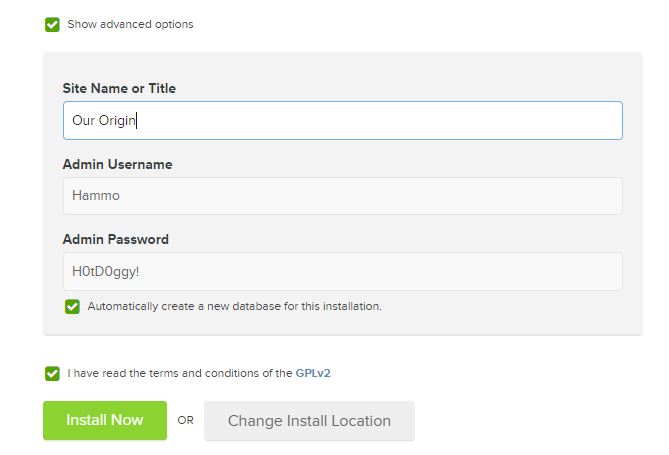
Step 4 – Advanced Options
Click both check boxes to setup your own WordPress login details. This step just allows you to choose your own Site Name, User Name and Password. Otherwise, you are given a default and are likely to change it afterward anyway.
Step 5 – Wait for 15 seconds
I’ve added this as a step, so you aren’t left wondering what is going on. WordPress should be installed and ready for action in around 15 seconds.
During this time you should see the following progress bars near the top of your screen.
![]()
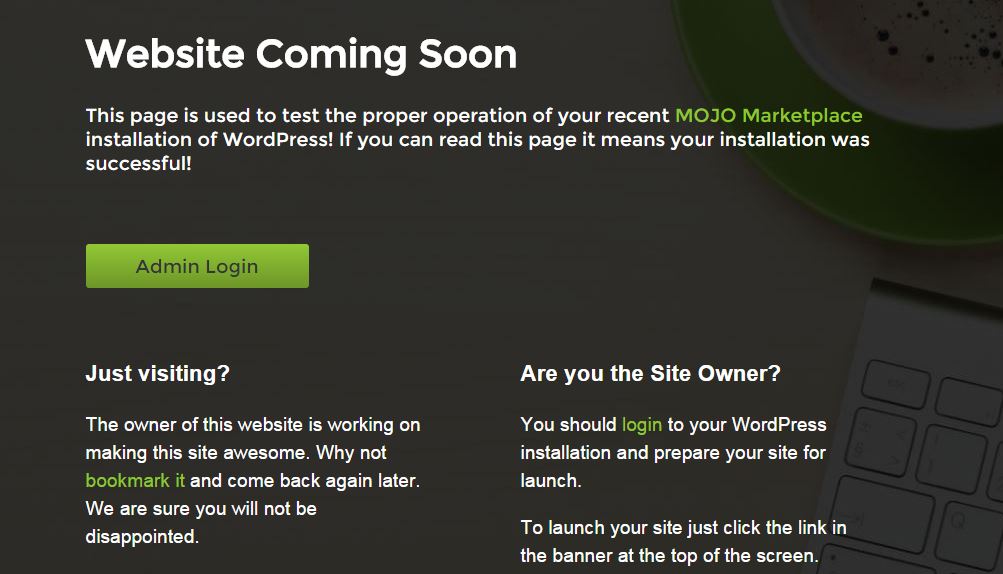
And when it’s finished you’ll see…

Step 6 – Navigate to your new WordPress Blog
Now open up a new web browser window and type in your URL (Domain Name) to have a look at your new blog.
If you see this message, then click on the ‘Admin Login’ button to be taken to your login screen. And as the message suggests, you should bookmark or favorite that page so you can easily get back there.
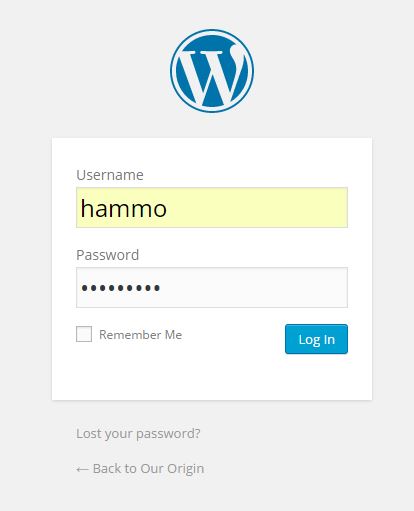
Step 7 – Log into your WordPress Blog
Now, log into your new site using the details you supplied in Step 4
NB: Note the URL for the admin panel is your domain name + /wp-login.php
For example – http://www.ourorigin.com/wp-login.php
Congratulations, you have successfully completed the ‘How to start a WordPress Blog on Bluehost‘ tutorial.
I knew you could do it, and it really wasn’t that hard was it?
Did Something Go Wrong?
As much as I try to give you step-by-step instructions, I understand that sometimes things do go wrong. If you haven’t already checked out the video instructions of this tutorial then maybe take a quick look before hitting the Panic Button. You’ll find it near the top of the page, just before Step 1.
If this still isn’t making sense then, you’ll be glad you chose Bluehost as your Blog Hosting Solution because their 24 hour / 7 day support is quite impressive. You can either call them on their support number US (toll-free):(888) 401-4678, open a ticket or start a live chat session with an operator. Just explain what step you are up to and they’ll guide you past your problem.
And finally you can always try to contact me, although I’m not available 24/7 it does seem like I’m always connected to the Internet. The best way to reach me is via
Email: hammo@startablog.info
Twitter: @DIYBlogGuy
FaceBook: Start a Blog Fan Page
Of course, you can always just leave a comment in the comments section below, and I’ll get back to you as soon as I can.
The Final Word
 So that concludes this tutorial, but I just wanted to say how proud I am that you’ve decided to take the leap and start your own blog. Hopefully, you find blogging as rewarding as I do and I’d love to hear what you’ve decided to share with the world. Please tell us in the comments section below, because ‘sharing is caring’.
Oh, and before I forget I’m putting together a comprehensive Blog Training Program that’ll cover Basic Blogging, Intermediate Blogging and even something for the Pro Blogger. Sign up to my newsletter if you want to be informed when it goes live.
Yes, Keep Me informed
And to make blogging accessible to more people, I’m giving away 10 Free Memberships to the Basic Blogging Training each month. The only way you’ll have this opportunity is by being on my email list.
If this tutorial has been helpful to you then please share it with your friends as the world needs more Bloggers.
