How to Bulk Upload Images to the WordPress Media Library
 Today you’ll learn how to bulk upload images to the WordPress Media Library using a plugin called ‘Add From Server’.
That’s right there’s always a free WordPress plugin for just about anything you’ll need and this is why I recommend WordPress over any other blogging platform. The community just makes it easy for you to get stuff done.
But why would you need to bulk upload images to WordPress Media Library?
Well, maybe like me you’re moving your files from one server to another, or even from one blogging platform to another, and although WordPress offers an Import feature, this doesn’t always upload the images you need.
Or perhaps you want to create a gallery in WordPress and plan to upload hundreds of images for a client.
Doing this one at a time can be tedious, so today I’ll show you how to bulk upload WordPress Images more quickly.
How to Bulk Upload Images to the WordPress Media Library
Copying a few images to the WordPress Media Library is easy enough, but uploading hundreds to the server doesn’t mean they’ll appear in your WordPress Media Library.
You see, WordPress doesn’t recognize files that are not uploaded via the dashboard uploader.
But that’s an easy fix with a WordPress plugin called ‘Add from Server’
How Bulk Upload WordPress Images
So first you’ll want to upload the files to your WordPress Server.
This can be done using a secure free FTP client called ‘Filezilla’ or if you’re using a Web Hosting Server like Bluehost, you can do this easily through the CPanel Interface.
And although uploading images through the CPanel Interface isn’t as secure as FTP, it’s much easier and security isn’t a big problem when uploading images as usually, you’re making these freely available on the web anyway.
Watch this quick video to see how it’s done…
And now here’s how to do this is you can’t watch the video.
Firstly you zip/compress up your images folder and using the ‘File Manager’ provided in the CPanel interface you upload the images to the uploads folder in WordPress. Typically the uploads folder is found here:- /public_html/wp-content/uploads
Then once the zipped file is uploaded you unzip/uncompress the folder.
Next, you’ll need to link these files to the WordPress Media Library.
Linking images to your WordPress Media Library with ‘Add From Server’
Ok, now your images are in the Uploads folder you now need to tell WordPress where they are.
We do this with a free plugin called ‘Add from Server‘
Go ahead and install the plugin before continuing. You’ll find the WordPress plugin here – https://wordpress.org/plugins/add-from-server/
And don’t forget to activate it.
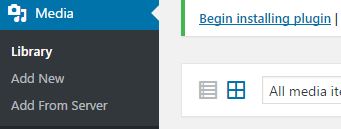
Once activated you will find it under ‘Media’ in the main menu.
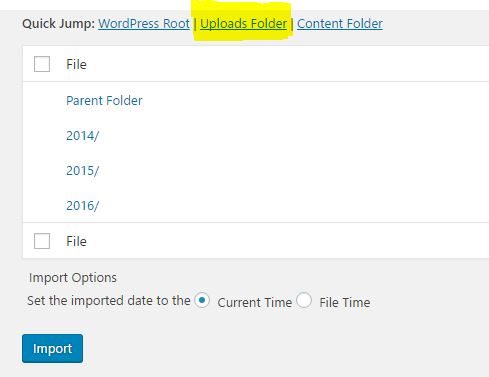
Next, navigate to the folder where you saved your images.
Tip: You can use Quick Jump to take you straight to the Uploads Folder.
Next, you simply select the files you want to link to the WordPress Media Library and then click Import.
It’s really that easy, and now when you search again in the Media Library, you should see the new images have appeared.
And because you can see them means they are now available to insert into your new blog posts. Happy Days!
If you’ve found this guide on How to Bulk Upload Images to the WordPress Media Library useful, then please don’t forget to share with your friends.
Share the post "How to Bulk Upload Images to the WordPress Media Library"


